30 January, 2011

Betty's in a Circle for Funky 15th Challenge

Good morning. Today it is my turn to share with you my DT project for the
Allison is our host this time and asked us to take inspiration from
CIRCLES
either by making a circular project or using circles/spots/dots in your DP - speaking of which Anice has designed a gorgeous freebie DP especially for this challenge and it's up for grabs here

So now you can join us in the challenge and be in with a chance of winning the fab prize of a
Funky Hand voucher as you need to use at least 1 FH product to qualify for the prize.
So here's my take on the theme:

I chose to make a circular card - really into these at the moment.
I have used Kraft card as the base - which I cut using my Cricut.
The DP's are from Funky Hand Paper Blossom download - available here
Image is also from Funky Hand - another recently new product range to the site
 
My image comes from the Celebrate set and I have paper-pieced her dress.

So far you have had inspiration from
Allison

Then the lovely Jules with a tutorial on a Circular Easel card
followed by Lou with a gorgeous make over to a note book
Then Anice gave you all a sneaky peek into the brand new CD being launched today on Create & Craft at 10am (more on that to follow!)
Then it was Kathy's turn and Kathy also gave you a wonderful tutorial for making a
Handbag shaped card (spot the Funky Freebie too)

So what are you waiting for - get your freebie (or any other FH product) and show us your circular projects.

And finally (hurrah I hear you shout!!!)
Anice will be launching her latest and most fantastic new CD rom in the Papercraft Factory series today on Create and Craft at 10am
and it really is packed full of great Design Papers, fab digital images - pre-coloured and outline, templates, writer to add your words, alphas - the list goes on and on and on.
Hope you feel inspired to join us this month - you still have plenty of time as the challenge runs from the 15th January to 14th February.
Jane will be back here on the 2nd Feb with another gorgeous project to inspire you - don't forget to check back then.
Have a fab day.
I'm off to grab a coffee and set Sky+ to record Create&Craft!
TTFN
Debs xx

27 January, 2011

Funky Fifteenth: Going Round in Circles, Kathy's turn...

We hope you're enjoying the new look Get Funky Challenge blog.   Allison is the "hostess" this month and we've been Going Round In Circles ever since.  As well as asking you to join in and make something Funky with Circles this month, we're all taking a turn at showing you our own project. So far there have been ideas from Allison, Jules, Lou and Anice and today it's my turn (Kathy) to show you what I've made for Allison's CHALLENGE -check the link to find out how to join in and be in with a chance of winning a Funky Hand voucher.

I've made a handbag shaped card
I've used papers from the Colour Me Happy CD, plus the Funky Freebie for this month (see the sidebar for more info). Anice  designed the freebie using the colour palette from the "Blissful Baby" colour palette, so I thought I'd make use of this extra design for my project.

It's such an easy card to make - all you need is an old CD and a sheet of A4 card.  To start with I printed one of the paper designs on one side of my card so that I could scan the pattern diagram on the white side.  Fold the sheet in half, open it out and draw a line 1cm either side of the fold line. Now draw around the CD, so that the edge of the disc is 0.5cm from the centre fold line. Repeat for the other side as shown - if you use the long edge of the sheet of card as guide you won't need to add more guide lines to get the circles in line.
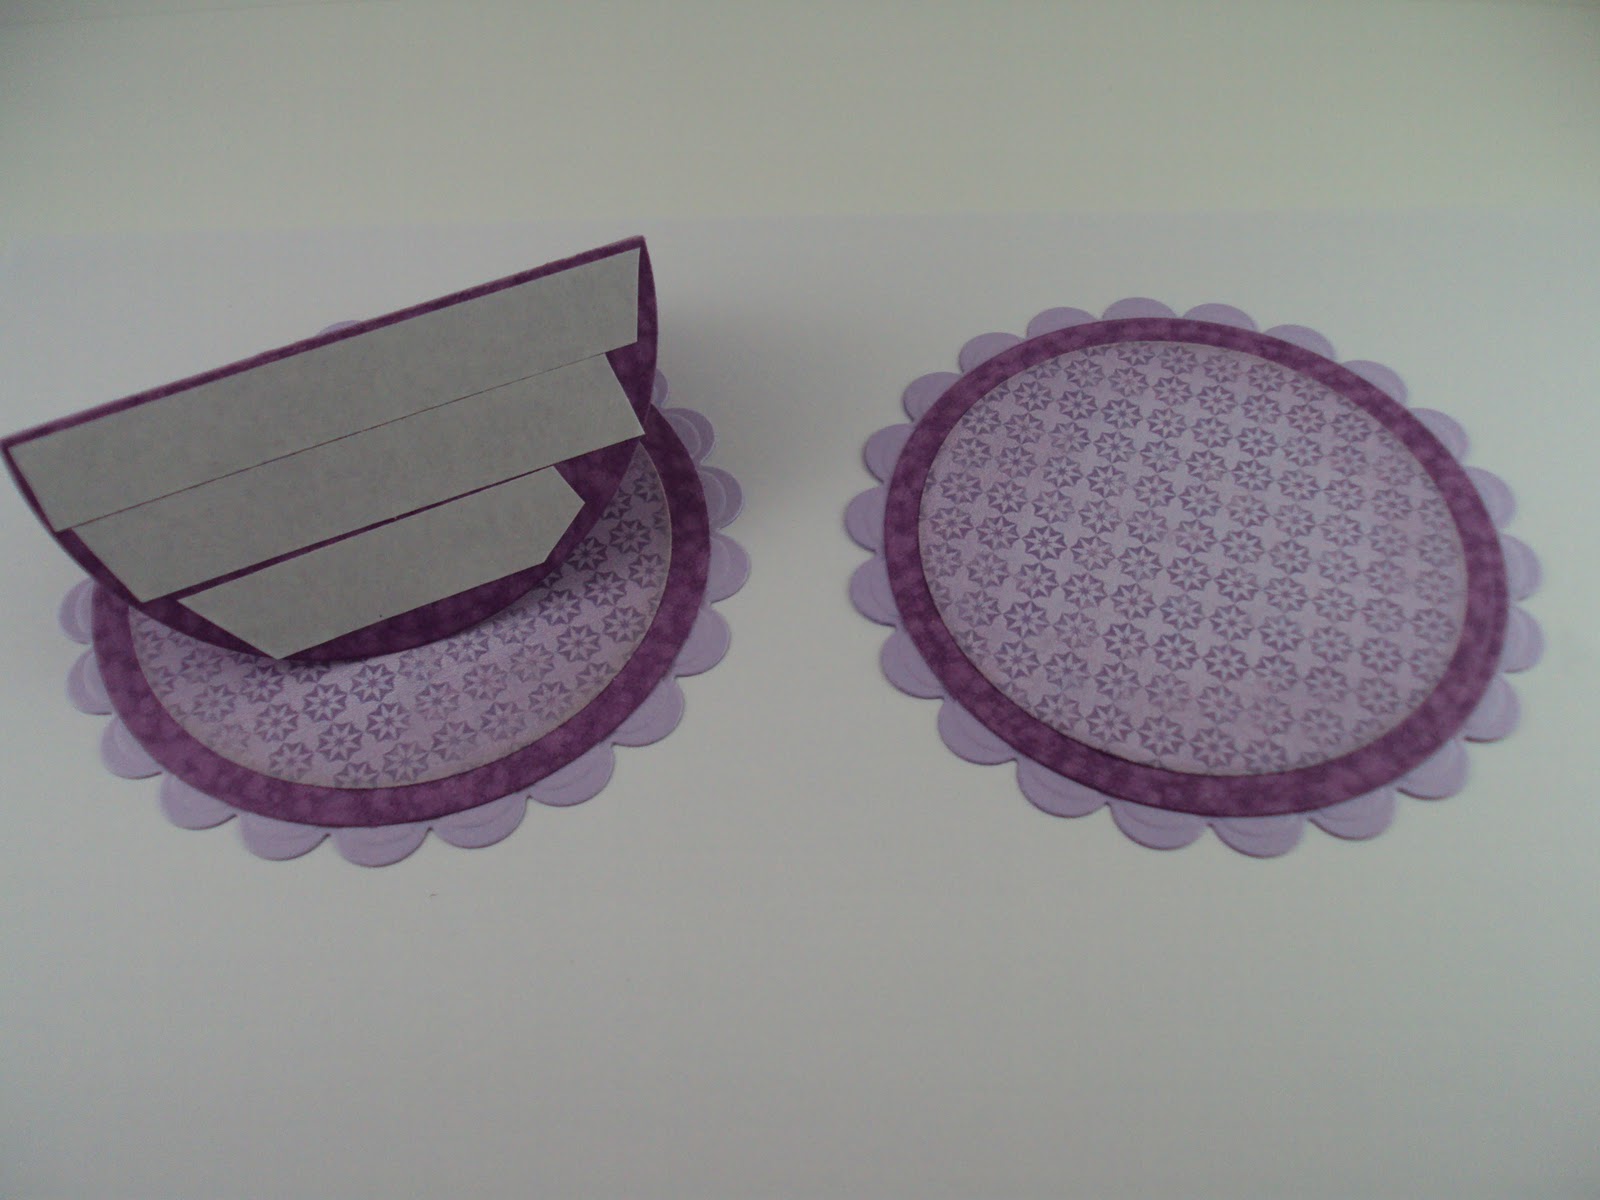
Cut around the whole thing so that you end up with this shape:
If you look closely you'll see some little holes - at either end - they were for the ribbon handles I was going to add before I changed my mind!
Make the folds so that the base of your bag is formed, then use another of the patterned papers for a "lining. If you make a paper pattern for the whole shape first, you could simply print your lining design on the other side of your card and use the pattern to cut the whole thing in one go iyswim

To make the handles I printed one of the aqua designs on both sides of another sheet of card.
I used 2 sizes of Nestability labels 9 dies to cut the shape.  I just cut off the part I didn't need and rounded the "raw" edges. You could hand-cut a handle shape or use ribbon as I'd originally planned.
Decorate your bag however you like - I've used some of the Funky Freebie paper on the lower section of the bag - I love the circles design Anice has created especially for this month's giveaway

The little bag charm ties around the back and front handles to hold the card together.  I used some narrow ricrac braid and one of the bits of aqua card that was left over from cutting the handles.

To make the flower, use some double sided paper (I printed on both sides of my favourite double sided printer paper which is brilliant for using with Funky Hand designs).
Cut 5 or 6 circles - you can make them plain, use a smallish scalloped circle die (Cuttlebug or Nestie etc) or use a punch as I've done here.
Crumple all the circles up tightly then carefully straighten them out again
pile them all up, make a hole through the centre and poke a brad through all the layers. as in pic 3
To finish, crumple each layer up into the middle - you get a better result if you do each one separately.
Add a blob of glue to the centre of the back and stick to the tag, "fluff" out the petals till you get a shape you like then add some pearls or other bling and it's ready to tie around the handles of your finished handbag card
I hope this has inspired you to have a go at making a handbag card of your own -  I also hope we're all inspiring you to join in with our challenge this month.  
The one rule we have  is that you use at least one Funky Hand paper or extra on your challenge entry.  If you don't own any Funky Hand papers yet, head over to www.funkyhand.com and find the freebie paper designed especially for this challenge.  Here's the link directly to it http://www.funkyhand.com/craft-downloads/backing-papers/funky-freebie  Each freebie is only available for the duration of that month's challenge and a new one will be appear on 15th Feb along with the next challenge.

Remember to add your entry for this month's Going Round in Circles challenge to Allison's original challenge blog post  HERE
Switch your TV on for  Create and Craft on Sunday 30th January at 10am and you will be in the right place for the launch of the BRAND NEW Funky Hand CD "Craft the Year Away".  The DT have been using it for the last week or so and we're all raving about how fab it is, and we just LOVE the wonderful new features that have been incorporated.  Set your machine to record the programme, you won't want to miss this one!
Thanks for looking hope you enjoyed my project.  It'll be Debs along on Sunday with your next dollop of Funky inspiration :)

24 January, 2011

Going Round in Circles - this months Get Funky! Challenge

Well..what do you think of the new look Get Funky! Challenge blog?  I think the Design Team lasses have done a wonderful job so far. It's my turn today (it's Anice by the way if you hadn't guessed) to give you a little more inspiration to join in with our challenge this month. 

Allison has set us the task of 'Going round in Circles' and to tell you the truth that's all I've been doing recently as I have been getting ready to release a new craft CD.  I'm happy to tell you that Craft The Year Away will be available to purchase on Sunday 30th January.  I'm launching it on a live TV show on the Create and Craft TV channel at 10am and then at 1pm it will be available to order from our website www.funkyhand.com  (If you fancy a sneaky preview of what you can expect to see on this new CD pop over to my website and click the demo button on the home page where Ian will talk you through the basics of the CD) As this is happening so soon I decided to make my challenge card with papers, digi stamps and a template from the new CD..


I have to admit that my wobble card is not exactly a circle but I've decided that it's close enough!! I hope Allison agrees with me!!  As I said my card has been made with a paper, coloured digi stamp (ohh, something new from this CD!!) and template (another new thing on the CD!!) from my new very soon to be released craft CD, Craft the Year Away

It would be great if you joined in with us this month. The one rule we have around here is that you use at least one Funky Hand paper or extra on your challenge entry.  But don't be concerned if you don't own any Funky Hand papers yet..you can go to my website www.funkyhand.com and find a freebie paper that I have designed especially for this challenge.  Here's the link directly to it http://www.funkyhand.com/craft-downloads/backing-papers/funky-freebie  but you need to be quick as I will be changing it to another paper on the 15th February that will go with next months challenge!

Right, so I'm really looking forward to seeing the cards that you create for this months challenge.  You can add your entry on Allisons original challenge blog post which you will find here: http://getfunkyandcraft.blogspot.com/2011/01/get-funky-funky-february-15th-going.html or click on the box at the top of the page to take you straight there.

So that's my card, you can expect to see a great card to inspire you here on the 27th January from Kathy. Now don't be shy, join in with us..we'd love to have you!

Anice xx

21 January, 2011

Funky Fifteenth Challenge- Going round in circles!

Well, its been 6 days since Allison kicked us off  in fabby fashion on our new way of doing challenges here on Get Funky with the Going Round In Circles challenge!!! so with that in mind it comes to me, Lou, to post my circley piece of inspiration for you!!

....and here it is........


I had a very boring looking little notebook sat staring at me on my workdesk and it wa screaming out for a bit of funkiness!!!!
I printed my papers out from the Colour Me Happy papercraft factory.I just love those big juicy polkadots!!
I adhered them onto my notebook and using my nesties I cut out some circle shapes to make a nice little home for my scrunched up flower.
The flower itself was really easy to make.
I punched 6 little scalloped circles out and screwed them up into little balls.
Then I unfolded each little screwed up ball, placed them on top of each other and used my crop o dile big bite to punch a little hole through all the layers.
I popped a little split pin through the hole and covered it with one of the juicy polkadots cut out from my scraps of paper.
Then all you do is just play with the layers to arrange your flower how you like it. I like mine a little scrunched up!!

So now a quick recap on how to join in.......

The main rule that you must use at least one Funky Hand product remains the same and to help you take part this month there is a freebie which Anice is so kindly giving away for this month to help you with this challenge
Your freebie can be downloaded  here from the Funky Hand website, keep checking back with us every month for a lovely new one!!

And remember, you will have to come back here every third day this month when a different DT member will be showcasing their project, so remember to follow this blog so you know when a new project has been uploaded. So be back for the 24th when Anice will have something to share with us!!

18 January, 2011

GET FUNKY!!! - GOING ROUND IN CIRCLES

Hi there everyone

So how are you liking our "Funky" new look?

We think it is so much better to show you all of our creations gradually throughout the month so that we can give you a little more detailed explanation as to what we did as "Funkettes" to make our projects, and hopefully give you inspiration for joining in the challenge with us.

Today it is my turn (Jules) to share how I interpreted Allison's theme.

Allison is our hostess for the January/February challenge and she chose the theme of "Going Round in Circles" .. .. .. mmm... ..  a theme I can totally relate to as I feel that is what I do some days LOL!!!

Here is what I created and wanted to share with you today:


It is a circular easel card and uses the Funky Hand Download "Hearts and Flowers". 

This is "one" of my favourite downloads .. .. mainly because I love "hearts" and the colour purple .. .. if you like the look of the download then you will find it available here.  There are also lots of other examples of projects that have been made using this download there for you to see too.

The actual flower on my project has been made from the download too .. .. the flowers print out as an actual flower and it is just a case of cutting them out and layering them up (I did use a punch for the green background leaves - no way would I be cutting those out!!).

The hearts and the sentiment are from one of Funky Hand's brand new stamp sets - Love 'n' That.  There are lots of images on the stamp set .. .. as you can see here .. .. but I just chose to work with the hearts on this one and paper pieced them using again the papers from the Hearts and Flowers download. 

Have you ever made and easel card?  I had only made rectangular ones until I tried this one .. .. and as it worked first time I thought I would share with you how I did it.

I cut my circles using a circular die in my cuttlebug machine .. .. but you could just as easily draw around a plate or a CD and cut it out with scissors .. .. .. well you can use anything circular really and any size you fancy.

Start off with a folded piece of card.  If using a nestability die in your cuttlebug (as I did) place the die so that the fold lies inside the circle .. .. .. if using say a CD .. .. you would place the CD so that the fold is underneath the CD. 


You can see in the picture below all the elements I cut and the letter "A" is where my fold is.  

  • I have my circles that are joined at the fold  (which will form the base of my card)
  • another plain circle (for the face of my card)
  • and two scalloped circles (just for decoration .. .. .. you don't have to have these).
Next open out the circles that are joined together and fold one of the circles in half.

The new fold you have just created is marked as "B" in the picture below.


The folded base of your card now looks like this .. .. you can see how easily it all takes shape.


Next cover just the lower half of your folded circle with glue or double sided tape as below.


So above you will see my double sided tape is on and I have glued on my decorative paper and scalloped circles to both the folded base section and what will be the "face" of my easel card.

To finish off you simply remove the backing off your tape and attached the face to the base by sticking one on top of the other.  Lining everything up nice and neatly. 


Open your card up and you can decorate it as you wish.  You do need to put something on the base to keep the face of your easel card from falling down .. .. some people use a button or a brad, a flower or a layered sentiment but I have used a piece of ribbon that I have ruffled onto some extra strong double sided tape.

I hope that I have explained this clearly enough for people to follow.

This technique works so well that I tried it with other shaped dies that I have and you can create them as squares, ovals,  .. .. I even managed a heart shaped one!!

If I have inspired you to take part in the challenge .. .. which I hope I have .. .. that would be great.  I would love to see your interpretation of  "Going Round in Circles" .. .. but remember that you do need to use as least one Funky Hand paper, or image on your creation.  If you don't have any at the moment then Anice has very kindly provided a free download for you to use .. .. .. which very coincidentally has circles on it!!  LOL!!!  You can find that at the very end of all the downloads that Anice has produced here.

I hope you like what I created and that my little tutorial was useful.  If you would like to see the full list of all the ingredients I used on my project then you will find this on my own personal blog which you can find here.

If you would like to enter our Get Funky! Challenge then link your project on Allison's challenge launch post here.

The next Funkette to be sharing with you is Lou and she will be here on the 21st January.

Have a great day everyone and happy crafting!!!

Love Jules xx

15 January, 2011

Get Funky- Funky 15th- Going Round In Circles

Welcome to another Get Funky challenge, the first one of the year and as you can see it has now moved to the Funky Fifteenth of the month.
It's my turn Allison to set the challenge and the challenge I have picked is

Going Round In Circles

so I want to see all sorts of circles on your projects whether it's on the paper, card shape and so on
The main rule that you must use at least one Funky Hand product remains the same and to help you take part this month there is a freebie which Anice is so kindly giving away for this month to help you with this challenge
Your freebie can be downloaded from the Funky Hand website, look for the freebie in the downloads section.

The other change to the challenge set up is that you will have to come back here every third day this month when a different DT member will be showcasing their project, so remember to follow this blog so you know when a new project has been uploaded- there will also be instructions and some tutorials on how the projects have been made

This way you won't forget to enter the challenge, still thinking you have all month and then before you know it the month has disappeared and your entry not completed and you lost the chance to win your choice of download from the shop


The fifteenth of this month is special in another way- it's the launch of OUR BETTY, four new fantastic clear stamp collections from Funky Hand and believe me they are wonderful to work with and you get a clear image all the time because of the deep etching on the acrylic
And to celebrate Betty's launch I have made her go round in circles


For this circular card I used papers from Man's World from the Now That's Funky CD.

I used a CD as a template and traced the circle onto card stock then covered the front with my paper and inked the edges

Scored and folded the circle in half and cut a scalloped circle from a nestie and inked the edges of the circle

Used the circle nestie to cut another circle from the dotty paper and attached to scalloped circle

Stamped and coloured Betty (from the Celebrate collection)with Pro markers and inked the edges again then layered her and some feathers, ribbon, flowers and button on to the card

Hope my card has given you some inspiration but if it hasn't then you must make sure you return on the 18th when Jules will be showcasing a stunner for you!

So go grab your freebie and Get Funky!


you have until 7pm on the 14th February to enter by providing your link below

AllisonX


14 January, 2011

The December Get Funky Winner

Hi everyone,

Thank you to everyone who entered our December Get Funky Challenge.  You will see tomorrow that we are having big changes happening here but it's my job to announce the winner from last months entries.  Drum roll... the winner is  Sheila

Congratulations to you Sheila, please contact me through my website www.funkyhand.com and send me a message via the contact us page and I'll supply you with your £20.00 winners voucher code and winners blinkie.

As I said at the beginning of this post tomorrow is the beginning of an all new Get Funky! challenge style, I hope you will join us for all the fun.


See you tomorrow
Anice xx

12 January, 2011

Christmas papers two ways!

Morning all and welcome to the home straight of this month's Get Funky Challenge, you have until Wednesday night to get your entry in to be in with the chance of winning the Funky Hand download of your choice.


For my cards I used the Twelve Crafters Crafting cd rom. I love it so much I have to admit most of my own Christmas cards have been made using it :o)


My Christmas card was made with the template that gives these cute wee trees (and saves on ink at this expensive time of year lol) I have simply added a bit of bling and some ribbon with a cute wee charm I found in my stash.


I love the shades of blue in the Wintery Magic collection and when I was thinking of a non Christmas card to make it shouted out "baby boy" to me. Just a few pearls and dew drops and some ribon to finish this off, the wording was all done in the write section on the cd and I love using it as you get the right shade for the papers.


Hope you will find some time to join us with this month's challenge. Please remember our only rule is you must use at least one Funky Hand item on your creation and if you haven't got anything suitable, snag yourself this month's funky freebie. Click on the blue frog and leave us a link to your creations.


Hope you are all keeping warm :o)


Hugs


Amanda xx