

The lacy star is really easy to make and looks stunning when finished (I hope you agree!). I have chosen papers from the Sleigh Ride download and below you will find a quick tutorial on how to make your own.
All you will need are some squares of paper (printed on both sides with the papers of your choice), a ruler, some scissors, a pencil and some glue or sellotape. I used 10.5cm squares but you can make them as big or as little as you want. So here's how to assemble it:
Step 1: Print your papers and cut to the desired size (as I mentioned above, mine are 10.5cm square). They have been printed onto normal print paper as card would be too thick to bend.

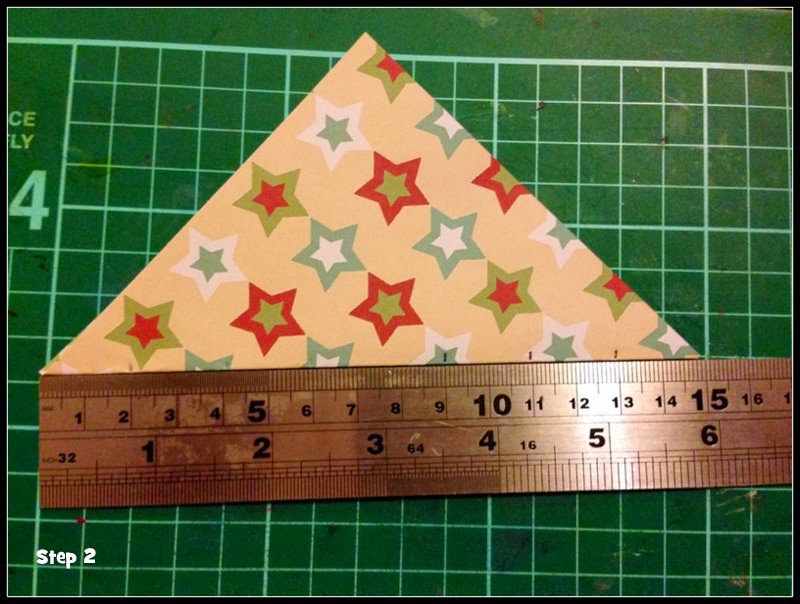
Step 2: Fold the paper corner to corner and mark from the edges every two cms. Dependent on the size of paper you are using you will need to adjust this, just make sure you have three evenly spaced marks either side.
Step 3: Using the marks you have made cut towards the apex of the triangle but DO NOT allow the cuts to meet. When you fold out your square it should look similar to the photo below.

Step 4: Fold the two middle sections and secure with tap or glue. If you are using glue I would recommend you use paperclips to hold the fold while the glue dries.

Step 5: Take the next section and fold it in the opposite direction. It should look like this
Step 6: Continue with the other sections, folding in alternate directions. When complete you will have something that resembles this

Step 7: Repeat the process 5 times to build up your star:

And finally to assemble, just glue (or staple) the points together. Once you have attached all 6 points, punch a hole in the top of one and attach some raffia or twine to hang.
A quick and easy make for Christmas and a wonderful way to showcase the fabulous papers! I hope the tutorial has been useful to you and if you would like to share any of your makes, please link them below or head on over to the Facebook page to upload your photos.
See you all soon, love Sammylou xxx
Wow, what a fantastic tutorial. Thank you so much for sharing this with us Sammylou, I'm off to give it a try.
ReplyDeleteAnice xx
This is a real stunner. I must find some time and give it a try T hanks Sam
ReplyDeleteoh my that is one super star!! its just stunning and I love the way the double sided printing makes it gorgeous on both sides xxxxx
ReplyDeleteAbsolutely adore this Sammylou.Fabulous tutorial.Hugs x
ReplyDelete