Showing posts with label Sleigh Ride. Show all posts

28 November, 2014

Forgotten Funkies...Sleigh Ride....

Good Morning everyone!!!

Its the time of month again for our 'Forgotten Funkies showcase!!! and each month our fabulous Funkettes will be here on our blog showing off some new makes with our older downloads and CD Roms. 

Today's showcase is centred all around the gorgeously funky and fabulously festive Sleigh Ride Download. Just look at this amazing collection of different backing papers and two wordbooks  included. 

Sleigh Ride Christmas craft backing paper collection contains Christmas backing papers with a quirky, bright colour palette including aqua,green and red. The backing papers contain designs that are perfect for your Christmas card creations but they also include many designs that can be used the whole year round on other projects. Take a look at the gallery to see the different card designs the Funky Hand Design Team created using this collection in the gallery over in the shop and some more recent makes below....

this download is most definitely too good to be forgotten!!!


Sleigh Ride downloadable backing papers.


Oh and don't forget!!! ALL the Funky Hand CDs are still priced at just £1.00 each over on the website www.funkyhand.com 

So that's enough of my wafflies - you want to see what our gorgeous girls have come up with don't you? ok, ok here they are, for more pictures and make details please pop in on their personal blogs by clicking on their names.......


Lou.
(Lou also used the Betty Love 'n' That clear stamp set.)


Allison


16 August, 2014

Sleigh Ride in Summer

Hello

It's Kathy here today and I'd like to share something I made this week using a new die and my fabulous Funky Hand stash.

Since becoming the proud owner of an eBosser machine, the world of A4 dies and embossing folders has been opened to me and I recently got my hands on a fab die for making a really neat gift bag. 
 The finished bag is 12cm wide. 18cm high and  7cm deep - so plenty of room for goodies in there!


As this is a big die making a good sized box, you need to cut the die twice and you need 2 sheets of A4 paper - so what better way to give the die a test run than with some Funky Hand designs.

Do you recognise these papers?
I chose to use "Sleigh Ride" which was one of the 2013 Christmas lines.  A little bit "left field" for crafting in the middle of August, I know, but I love these colours and several of the designs are not really Christmassy at all - it's such a shame not to use them for other projects, don't you think?

So I printed two copies of the gorgeous spotty pattern onto some white Bazzill card (any sturdy paper or thin card would do), plus another sheet to make the striped "border", the bow, gift card and flower decoration. As I knew both sides of the tag, bow and flower would be seen I printed on both sides of the card I needed to make these.
Then it was just a case of doing the die cuts and sticking it all together. 
I used one of the bits of waste (from the hole in the handle) to make a closure for the bag.
The bow and the tag come in the die package.
The bow is clever as its just one piece and you fold it up to create the bow.
I cut the tag twice, then tied the two pieces together with some seam binding.  I punched a tiny heart in the corner of the top piece
The flower is made with 5 punched flowers  here's a closer look at the decorative bit:

 Ingredients
"Sleigh Ride"  download from  Funky Hand
Paper or card for printing
Gift Bag with bow and tag; A4 die form Xcut 
SU Blossom punch, Tiny heart punch
Seam Binding or Ribbon

The bag was so quick to make and using Funky Hand papers means bags and boxes look great even before you start decorating them! 
I'm thinking this would look fab in the gorgeous deep blue shades of the Winter Wedding collection for a more masculine gift wrapping.  I have the lovely pin striped papers in mind, but I just need to figure out a more manly decoration that a bow and a flower and then give it a try.
That's it for now - I'm off to print out those Winter Wedding papers and
 have a go - if you pop by my blog sometime soon, you might find that I actually got it done ;) 
Stranger things happen at sea.....as my Grandad used to say.

Thanks for visiting - please leave a message - it lets us know we're not just talking to ourselves!

Happy Funky Crafting

25 January, 2014

A Quick Male Card

Here is a little something to share with you - all the printed papers are offcuts and are from the Sleigh Ride download paper pack - so you see - Christmas papers can be used all year round!

I've used a Kraft card base and then added the papers, using recycled string and star die cuts along with a tag die cut.

The sentiment I've handwritten and its all layered up with foam pads.  I don't like to throw away my offcuts and I'm glad I saved these!  What do you make with your offcuts - why don't you show us!

02 November, 2013

Sleigh Ride Lacy Star

Hello All, Sammylou here and today I would like to share with you a paper ornament I have made.


The lacy star is really easy to make and looks stunning when finished (I hope you agree!). I have chosen papers from the Sleigh Ride download and below you will find a quick tutorial on how to make your own.

All you will need are some squares of paper (printed on both sides with the papers of your choice), a ruler, some scissors, a pencil and some glue or sellotape. I used 10.5cm squares but you can make them as big or as little as you want. So here's how to assemble it:


Step 1: Print your papers and cut to the desired size (as I mentioned above, mine are 10.5cm square). They have been printed  onto normal print paper as card would be too thick to bend.


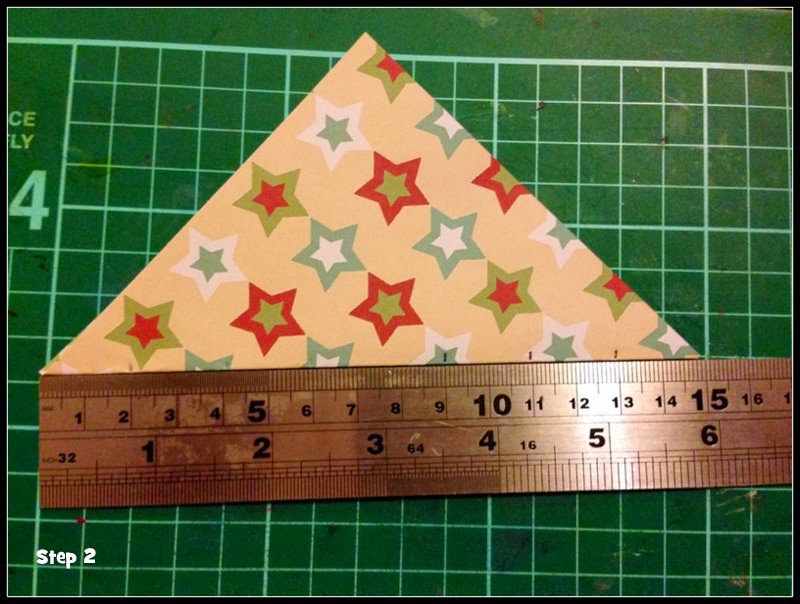
Step 2: Fold the paper corner to corner and mark from the edges every two cms. Dependent on the size of paper you are using you will need to adjust this, just make sure you have three evenly spaced marks either side.


Step 3: Using the marks you have made cut towards the apex of the triangle but DO NOT allow the cuts to meet. When you fold out your square it should look similar to the photo below.


Step 4: Fold the two middle sections and secure with tap or glue. If you are using glue I would recommend you use paperclips to hold the fold while the glue dries.


Step 5: Take the next section and fold it in the opposite direction. It should look like this


Step 6: Continue with the other sections, folding in alternate directions. When complete you will have something that resembles this


Step 7: Repeat the process 5 times to build up your star:


And finally to assemble, just glue (or staple) the points together. Once you have attached all 6 points, punch a hole in the top of one and attach some raffia or twine to hang.

A quick and easy make for Christmas and a wonderful way to showcase the fabulous papers! I hope the tutorial has been useful to you and if you would like to share any of your makes, please link them below or head on over to the Facebook page to upload your photos.

See you all soon, love Sammylou xxx

20 October, 2013

Meet Bot!

Hope you enjoyed the Shabby Saturday Showcase and it always amazes me how one collection of papers and digi letters can be transformed into many different products!  If you've not seen the post, then pop downstairs - its underneath this one!

I've used the new digi stamp called Bot - Fire Away and teamed him with left over papers from Sleigh Ride download.  Bot is really easy to colour especially if you're not keen on digi stamps - I've used Promarkers.  I've also used some star die cuts to use up some of the titchy bits of paper (I hate to throw any bits away!)

To finish off, I've added a faux stitched line and a bit of inking!

Don't forget to link up your Funky Hand creation with the linky below - we'd love to come and visit you!