29 May, 2011

Canvas Art


This is what you get when you add one canvas board, a Gold Ochre Aquamarker, a water spritzer, a heat tool and a brown ink pad to Kathy's wonderful Recipe...

3 different papers (I've used the freebie paper & the I Do Wedding Word Book download)
5 flowers (any old flower stamp you have lying around will do, I've used Dashy Dot by The Artistic Stamper)
2 buttons (I've used February Love Button Collection)
1 length of ribbon (you can chop this up to taste) (I've used February Love again!)
A sprinkling of pearls or gems to season. (I've used Colorbok Metal Dots)

I hope you like it! 

For all the details on how to enter this month's challenge click here! Remember to use your Funky Hand products!!!

Until next month... Happy Crafting! 
Jenny.


27 May, 2011

Get Funky Challenge for May - Master Chef Recipe

Hi Everyone, it's Paula here.

It's my turn to show you what I've come up with for this months challenge, which was set by our Kathy on the 'Funky Fifteenth'!  Kathy has set us a great challenge this month by giving us a recipe to follow - and I know that all the DT have been cookin' up a storm for your inspiration this month!

Kathy has asked us to include the following in her recipe: 5 flowers, 3 different papers, 2 buttons and a ribbon - all mixed up with a light seasoning of a sprinkle of gems and/or pearls.

Well, well, well.  Where to start huh!  I knew straight away that I wanted to do a larger card, so I got two sheets of 300gsm A4 card and printed this months freebie on one side of each of the sheets.  I love how Anice has designed this paper which some of us think resembles Kraft paper (with a bit of a pattern to it).

I decided to use the 'Shabby Saturday' collection of papers because of the lovely pinks and creams that have a 'shabby chic' quality about them.  The collection includes 24 sheets of papers and element sheets which include flowers that are ready to just print and cut.  The collection also includes a co-ordinating alpha collection and has sentiment toppers too.  Check it out here in the download section of the web shop where you will also see some more samples in the gallery.  

Anyway, I decided to print the cream and pink polka dot paper on the reverse of the freebie paper - and did this to both sheets.  I then scored both pieces at 8" because at first I was going to make an 8x8" card - then decided not to cut it down entirely and instead, make a sort of a spine - with the 8x8 bit as my 'canvas'

To attach the sheets together, I punched each sheet, starting in exactly the same place so they would match up perfectly, with my EK Success ribbon border punch, then threaded pink 5mm grosgrain ribbon through - this attached the two sheets securely enough not to warrant doing anything else, but in the end I did put some adhesive up to the scored marks where the card will open. (Check - one ribbon used!).


The large flowers were printed then cut from the elements sheet included in the collection.  The smaller flowers are from exactly the same elements sheet but printed at 50% (through the windows live photo gallery), then cut and mounted.  I scrunched and folded them to make them look like they do - infact, I gave them a right rough time!!!  The leaves were cut freehand from a sheet found in the 'Mint Madness' collection, folded to resemble veins in the leaves then lightly touched with a green chalk ink stamp pad. (Check - 5 flowers used - and so far, 3 different design papers used).

The square mat in the centre of the card was printed again, from the Shabby Saturday collection - this was to create a contrast on the whole page.  To invert the corners, I simply used a circle punch each corner - which does the opposite to rounding it off.  Spellbinders Large Labels and Small Labels makes the same shape - but not the size I needed, so measure and cut your square / rectangle, and nip each corner with a circle punch.  Obviously different size circle punches will give a different effect.


The ribbon across the page is another design from the Shabby Saturday collection.  I cut 2 strips from the length of the A4 sheet then did a random pleat across the page - just secure in place with a glue runner.  To here I attached my sentiment, which wasn't the original one I wanted to use... I had cut one of the sentiments from the sentiments sheet in the collection - then lost it.  Because I wanted to complete my project, I used a topper from a selection I had in my stash and distressed the edge with an ink pad just to leave it looking less plain.  Either side of the sentiment I added my final ingredients - 2 buttons.  (oops - I sneaked some mirri card onto my card - please forgive me!).  The ornamental corner is a cuttlebug

Finally, I mixed all my ingredients together - then added my seasoning, which was a generous portion of diamond Stickles, and here is the final result:


Granted, it will never qualify for a 'clean and simple' challenge - but sometimes its good to indulge!

Please remember to go HERE to Kathy's post to read how to qualify for the challenge - but if you know by know what is required of you - use the linky thing below to upload your challenge entry card/project.

Thank you so much for dropping in and looking at my DT Challenge card - 'til next time, this is Paula signing out!!! x x x

24 May, 2011

Recipe for Spotted, erm, Kitty!


Morning Funky Fans!

Kathy has chosen a great Recipe Challenge for us to play with:

5 Flowers

3 Different Papers

2 Buttons

1 Ribbon

Seasoning to taste - a light sprinkling of Gems or Pearls


My card was inspired by the gorgeous
freebie Anice has created this month. Have you seen it yet? It's all Krafty and Spotty, which is an absolute winner for me. Of course, the idea I started with is completely different to the card I've ended up with, always the way isn't it?!

I've used papers from
Rainbow Polkadots, Love Love Love and Salt and Pepper Downloads from Funky Hand. Along with a digi from the Colour Me Happy CD. I've just added some doodling to the red spotty paper, and otherwise, the cute image did all the work.

You still have loads of time to play along with us this month, but don't forget you'll need to use a Funky product somewhere on your project. If you don't have any, you can snag the fabby freebie. Be quick though, because you won't be able to get it after this Challenge closes on 14 June.


Right, I'm off to make something Pink, Krafty and Spotty...

21 May, 2011

Ruth's Word Book Recipe

Welcome to my (Ruth's) turn for Kathy's wonderful recipe challenge! I've made a Wedding word book using the I Do Word Book download as one of my cousins gets married later in the year and I'm trying to be organised!

I've printed the letters off and then an extra sheet to make the gap in between the words. I've added flowers, pearl brads, buttons, faux diamond heart buckle and a fair amount of ribbon! I've also dotted some liquid pearls on the letters for added detail and along the edge of the extra sheet.

The ribbon is fancy on the back (just didn't take a photo!) and I've covered the middle knot with an extra bit to keep it all tidy. As the papers are quite neutral, you can really vamp it up with your colour scheme, however I've played safe not quite knowing what the colours of the Wedding are going to be!

Good luck in joining in - please remember to follow the theme and to use a Funky Hand product, and as always, there is a freebie you can snag from the download section if you want to use it. The deadline for entries is 14 June!


18 May, 2011

Funky Recipe - Deb's Make

Good morning. How are we all today - well I hope.
Today it's my turn to share my make for Kathy's Funky 15th Recipe challenge at Get Funky
and here's the recipe:

5 Flowers
3 Different Deign Papers
2 Buttons
1 Piece of Ribbon (you can cut it into pieces if you like)
Plus Seasoning to taste - a light sprinkling of Gems or Pearls

and here's what I cooked up:


I used papers from Funky Hand's Minty Madness digital downlaod
available here
Fantastic value for money - 20 gorgeous Design Papers and a sheet of co-ordinating alphas and stars all for £3.49 - what a bargain!
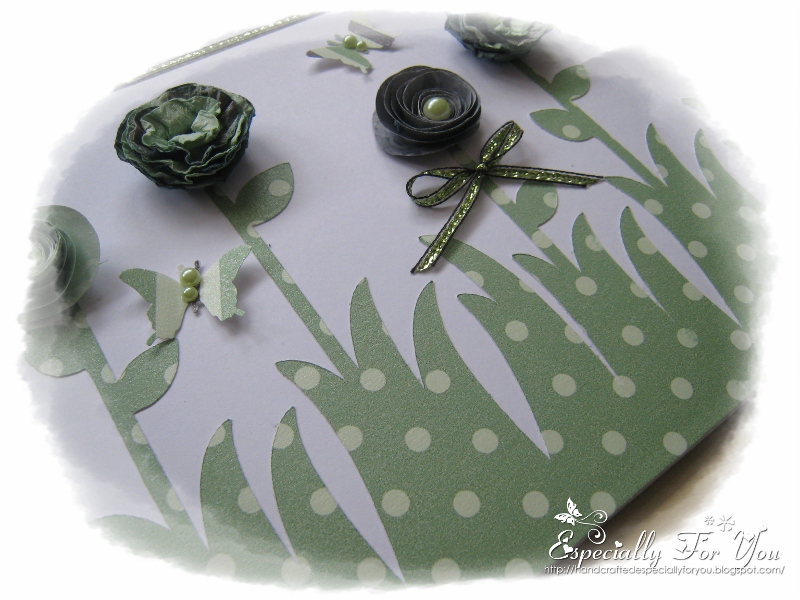
I made 5 handmade flowers - 3 rolled ones and 2 shabby chic ones - simples!
I added some adhesive pearls to the centres.
The 'grass' and 'flower stems' has been cut using my Cricut cartridge - Straight form the Nest.
Ribbon from local Sugar Craft cake shop
Buttons from stash
Flutterbies - Martha Stewart Punch

Hope you like it?
Don't forget that you need to use at least 1 Funky Hand product to qualify for the very generous prize from Anice at Funky Hand and to make it easy for you Anice is also offering another
Funky 15th freebie this month - available here

Hope you can Get Funky with us this month.

15 May, 2011

Kathy's Funky Fifteenth: Master Chef Recipe!

Hello and welcome to a brand new Funky Fifteenth Challenge.
First though, a Great Big, Funky THANK YOU to all who joined in with Debs' Spots and Stripes challenge over the last month, what a wonderful array of projects we saw.
It's Kathy here playing Hostess this month and despite the name of the challenge you don't need to head into the kitchen, and nor do you have to make anything with a foodie theme, but you do have to follow a recipe.
The idea is to cram all the elements in my ingredients list onto your card, page, or other project then come back and show us all what you've made,  Remember you MUST use at least one Funky Hand product to join in and qualify for our monthly prize. 
To make it really easy Anice has created a fabulous new Funky Freebie which will only be available for the duration of this challenge so grab it quick.  This month's paper has a lovely Kraft look and a soft pattern of dots all over it.  You can grab it from the sidebar and we hope you enjoy using it.

Okay, let's get cooking!  Here's the list of ingredients - you need to include all of them on your creations:

Ingredients:

3 different papers
5 flowers
2 buttons
1 length of ribbon (you can chop this up to taste)
A sprinkling of pearls or gems to season.
At least one Funky Hand product must be included!
Over the next month the members of the Funky Hand Gang will be popping by every couple of days with a new project using these ingredients so please come back often to see what's been cookin' in the FH kitchen!
To start the pot boiling, here's my card
Method
I printed 1 x A4 sheet of this month's Funky Freebie, then resized (to a quarter* of an A4 sheet) one of the Black Stripey Stripes designs (download collection) and over-printed this
onto the the Freebie paper.  
I also rotated, resized (to half A4) and printed the black and white spotty design from the 
*the screen shot shows how I resize the papers.  For half an A4 you need to rotate by 90deg first.  Select "resize by actual size" and "by pixels/cms" then alter the resolution to 85 as you can see from the height/width boxes this is roughly the right size to print a half sheet of A4.
To print a quarter sheet of A4 you don't need to rotate the design first - just alter the resolution to 125 and you will be able to fit 4 designs on one page

How I used my:
3 papers
The first layer of paper is the Funky Freebie Kraft design - I embossed it with the Distress Stripes embossing folder from Cuttlebug then adhered to the black card blank
I used one of the Martha Stewart Deep Border punches for the scalloped edge on the spotty paper layer
Layer 3 is a strip of the over-printed Kraft Freebie ( I really love the way this worked out!)

5 Flowers
the central flower is made from "flat" paper blossom layers held 
together with a wired rose. 
The other 4 flowers are coiled roses made from scraps of my printed papers.  
2 made from the leftover striped and 2 from the Kraft Freebie
I used double sided printer paper for mine so started off by printing the Kraft design on both sides of my paper - an alternative would be just to ink the reverse of your printed paper.

2 Buttons
I foud a lovely cream button with big slits so was able to thread my ribbon through the slits easily, rather like using a buckle. Button no. 2 is a teeny tiny one which I tied  a 4 thread strand of regular thread through and tied in a bow (fiddly! :-O)

1 Piece of Ribbon
Dark red satin ribbon.  I was going to tie a bow until I spotted the button in my stash.

Seasoning
I used the Imaginisce I-Rock tool and pearls to fix the pearls onto the ribbon.

So that's my way of using those ingredients, I hope you'll enjoy putting them together to make your own creation - I can't wait to see what you come up with.  Leave us a link so we can see what you make - but don't forget to use that all important Funky Hand product!
I'm passing the Chef's Hat on to Debs now and she'll be your Master Chef on the 18th May so don't forget to come and see what she's mixed and stirred up for you!
******************

Spots & Stripes Winner & Top3

Hi it's Debs here to hand you over to the

Hostess with the Mostest


for our new Funky 15th challenge.

But just before I do I would like to thank everyone that found somne time to join in with my
Spots & Stripes Challenge.

As always there can be only 1 winner and that lucky person is

**************************
with this gorgeous entry

I love the bright & cheery feel to this card.

Jessica please contact Anice to collect the download of your choice from the website by sending a message via the contact us page on the Funky Hand website. www.funkyhand.com
Top 3 Blinkies are going to:


Congrats ladies please contact Anice for your blinkies via the contact us page on the website www.funkyhand.com and wear them with pride on your sidebar

So now it's over tp Kathy for another fab Funky 15th challenge.
Hope to see you join us again soon.
TTFN
Debs xx